Carnegie Mellon University

ActiveTutors Project

GridCity Programming


This page contains the following links:

Description

GridCity is a simulator for teaching gradual introduction to programming while exposing the user to real Java langauge and environment. Students write programs in Java to control agents in the simulator. This provides a systemic and gradual introduction to help guide how the students think while writing programs to solve problems. Additionally, it provides a simple visual environment in which students can experiment and see clearly what the programs they write are doing. GridCity itself is also written in Java. Java provides a platform for experimenting with object-oriented programming and facilities for event-driven and client/server programming. Students write programs in an actual Java programming environment (JDK 1.2.1, for example) rather than using only the simulator. The simulator is simply made up of Java libraries/objects.

Requirements

Before you can use GridCity, you will need to have a Java development environment installed on your machine. In this document we will provide instructions for using the Sun JDK with Windows 95 or Windows NT. If you are using a different Java development environment, these instructions may not be correct for your setup. If you do not have a Java development environment installed on your machine, you can download Sun JDK from java.sun.com. Please follow the instructions that come with the Java environment to install it or consult your local system administrator.

Download

You can find GridCity and instructions for downloading it at
https://dataprivacylab.org/activetutors/gridcity/download.html.

Running the Simulator

Getting Started with GridCity

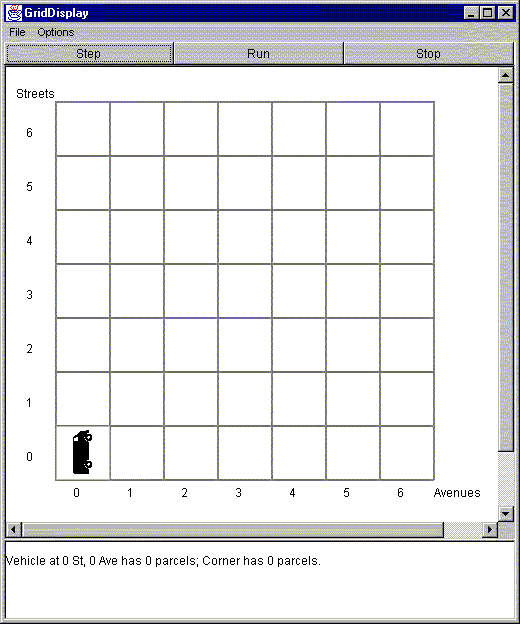
Once you have installed all of the necissary files, you are ready to try it out and see if it works. From the DOS prompt, use the cd command to make your GridCity directory the current one. Once you are in the correct directory, type javac *.java to compile all the code that is not already compiled. Now you are ready to run the first example. Type java Demo. GridCity should then appear, with a demo program.

When the example screen first appears, the vehicle will not move. You must click on the "Step" or "Run" buttons above the grid to make the instructions execute.

The "Run" button will cause the vehicle to execute instructions without stopping. The program will pause after each action instruction (ahead, turnLeft, pickup, or deliver). The delay is controllable from the "Options" menu. You may choose from 0.2 seconds to 3 seconds of delay. Clicking either "Stop" or "Step" will make the execution to pause.

The "Step" button will cause the program to execute and then stop automatically after the next action instruction (ahead, turnLeft, pickup, or deliver) is complete. You may click "Step" repeatedly to execute the entire program or click "Run" at any point.

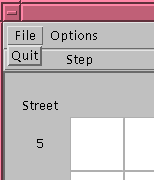
To exit the simulator, choose "Quit" from the "File" menu.
You are now ready to begin developing your own code for use with this system.

A Simple Example

The demo program that you just ran demonstrates the easiest way to control a vehicle, andie. When the program begins, it creates the "world" of GridCity and reads its state from a "world file." You can instruct the vehicle to move about, and when you do, you are doing simple programming. Below is the complete code for the Demo.java program you ran above:

/**
  * This is a small demo program
  * Intended to test if GridCity and the JDK are working correctly
  **/

public class Demo {
	// The World
	private static World theCity;
	// The Vehicle
	private static Vehicle andie;

	// The main method	
	public static void main(String args[]) {
	
		// Creating a new World using the specified World file
		theCity = new World("Blank.gcw");
		// "Creating" andie
		andie = theCity.getVehicle();

		andie.ahead();
		andie.ahead();
		andie.turnLeft();
		andie.turnLeft();
		andie.turnLeft();
		andie.ahead();
		andie.ahead();
		
	}
}
The java file from this example ->
Demo.java The gcw file from this example -> Blank.gcw

Each time you write a program, the "Main" method is what will be executed. This is where the program will start. In the first few programs that you write, all of your code will be in the main method.

The first thing that you'll see in this code example is

/**
  * This is a small demo program
  * Intended to test if GridCity and the JDK are working correctly
  **/

These are the opening comments. It is a good idea to include comments that tell you what the program will do. In most of your assignments these comments will also include your name and section as well as the assignment. Also not that any code after double slashes (//) is also a comment. these may appear through your program to make notes to yourself or anyone else that may be reading your code.
After the openeing comments you'll see:
public class Demo {

Demo is the name of the program, and it will change from program to program. the words public and class, however will always be there. The { bracket marks the beginning of the Demo class. All of you code will be after this bracket. Please note that the class name is Demo and it is in a file called Demo.java. This is required. You MUST have the same class and file names or your program will NOT compile.

The next thing that you see in this code are the declaration of the Vehicle and the World:

	// The World
	private static World theCity;
	// The Vehicle
	private static Vehicle andie;

You do not HAVE to declare them this exact way, but in the first few programs it is a good idea until you get a handle on what you are doing and understand what declaring the variables means.

Next comes the main method. Again, this is the method that will execute when you run your program. The method header for main looks like this:

	// The main method	
	public static void main(String args[]) {

For now, don't worry about all this. This line will appear in every program you'll write for now, so just remember that this is the start of the main method. The { bracket marks the beginning of the main method. After this is the first line of code that your program will execute.

The first thing that our program here does is to create a new World and Vehicle:

		// Creating a new World using the specified World file
		theCity = new World("Blank.gcw");
		// "Creating" andie
		andie = theCity.getVehicle();

For the first few programs, these lines will also remain the same. Later on you will understand what to do when you need to use a different type of vehicle.

Next come the actual command that we are giving andie:

		andie.ahead();
		andie.ahead();
		andie.turnLeft();
		andie.turnLeft();
		andie.turnLeft();
		andie.ahead();
		andie.ahead();

These lines will change from program to program, and tell andie exactly what it is he should do. It is a good exercise to practice by simply changing these lines slightly and re-compiling and running the program to see the changes.

The only thing left in the program is:

	}
}

These simply close the main method and the class.

How To Change Graphics in GridCity

GridCity comes with a package of graphics including alternate backgrounds, walls, vehicles, and parcels. To view the images, go here.

There are two basic ways to change the graphics in GridCity. The first option is to do this through putting the graphics for that background and walls into the world file. To do this, please read the next section on Making World Files.

The second option is to code the graphics in your program. There are methods provided to make changes to the background and wall images in GridCity, as well as setting the images for any new vehicles and/or parcels that you create.

To change the background graphics there are currently two methods. Both of these methods are to be called on the world. There is also a method to change the graphics that appear as walls. So, using our previous example, but using a different world file, and giving the program a different name, I will change the background, then change the wall images. I will then change the background without refreshing. This will only change the background image for a corner as a vehicle enters it. This is useful in programs that would do things like solve a maze, so you can see if there is any area of the world where the vehicle never goes.

/**
  * This is a small demo program
  * Intended to test if GridCity and the JDK are working correctly
  **/

public class GraphicsDemo {
	// The World
	private static World theCity;
	// The Vehicle
	private static Vehicle andie;

	// The main method	
	public static void main(String args[]) {
	
		// Creating a new World using the specified World file
		theCity = new World("graphicsExample.gcw");
		// "Creating" andie
		andie = theCity.getVehicle();

		theCity.setBackground("Ocean.gif");
		theCity.setWall("LifePreserver.gif");
		theCity.setBackgroundNoRefresh("Space.gif");
		
		andie.ahead();
		andie.ahead();
		andie.turnLeft();
		andie.turnLeft();
		andie.turnLeft();
		andie.ahead();
		andie.ahead();
		
	}
}

The java file from this example -> GraphicsDemo.java The gcw file from this example -> graphicsExample.gcw
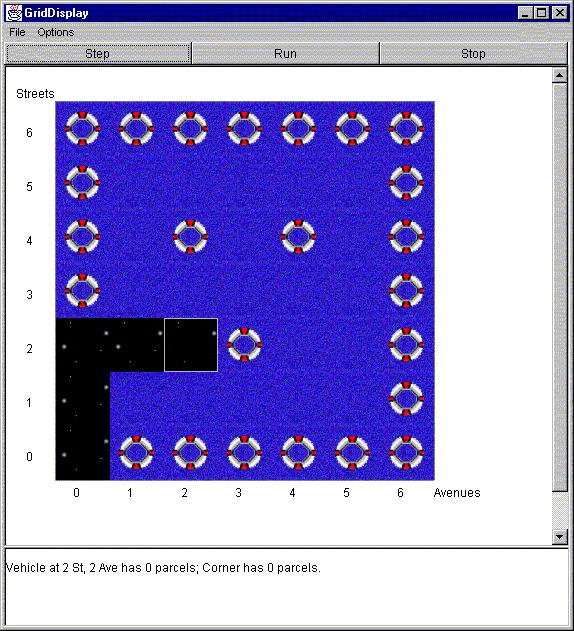
At the end of this program you are left with something that looks like this:

You'll notice that you cannot see the vehicle in the picture. This is because the vehicle still has the default image. To change this, we will have to create a new type of vehicle. Creating a new type of vehicle is done by writing a class that extends the Vehicle class. Within this class's constructor, you can set it's image to be different from the default. Let's create a boat:

public class LittleBoat extends UltimateVehicle {

	public LittleBoat() {
		setAttribute("imageName", "boat");
	}	

}

Please remember that to give the "imageName" of "boat" means that the REAL images that will be used are "boatEast.gif", "boatWest.gif", "boatNorth.gif", and "boatSouth.gif". All of these images must be present.

Now that we have created a boat let's use it in our program:

/**
  * This is a small demo program
  * Intended to test if GridCity and the JDK are working correctly
  **/

public class GraphicsDemo2 {
	// The World
	private static World theCity;
	// The Vehicle
	private static Vehicle andie;

	// The main method	
	public static void main(String args[]) {
	
		// Creating a new World using the specified World file
		theCity = new World("graphicsExample.gcw");
		// "Creating" andie
		andie = new LittleBoat();
		// Now that andie is not a plain Vehicle, we must replace him
		theCity.replaceVehicle(andie);

		theCity.setBackground("Ocean.gif");
		theCity.setWall("LifePreserver.gif");
		theCity.setBackgroundNoRefresh("Space.gif");
		
		andie.ahead();
		andie.ahead();
		andie.turnLeft();
		andie.turnLeft();
		andie.turnLeft();
		andie.ahead();
		andie.ahead();
		
	}
}

The java files from this example -> GraphicsDemo2.java
                                 -> 
LittleBoat.java The gcw file from this example -> graphicsExample.gcw
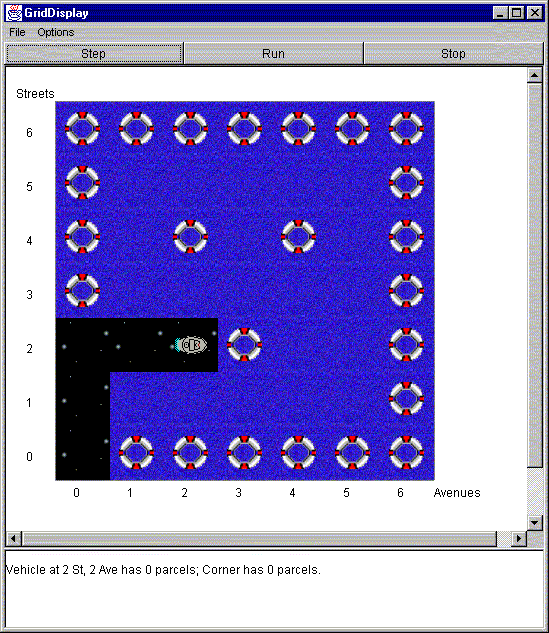
Our program now ends looking like this:

To change the images for parcels, you do almost the same thing as you did for the vehicle. You create a new parcel class. Let's say that we want all of the parcels to be boxes:

public class Box extends Parcel {

	public Box() {
		setAttribute("imageName", "blueBox.gif");
	}
	
}

Now, we will use a different world file that has "Box" parcels in it. When you create a new class of parcel, you may put those types of parcels into a world by editing the world file. There is a section below on how to edit world files. Now that we have done that, we can keep our program the same except for the world file:
/**
  * This is a small demo program
  * Intended to test if GridCity and the JDK are working correctly
  **/

public class GraphicsDemo3 {
	// The World
	private static World theCity;
	// The Vehicle
	private static Vehicle andie;

	// The main method	
	public static void main(String args[]) {
	
		// Creating a new World using the specified World file
		theCity = new World("graphicsExample2.gcw");
		// "Creating" andie
		andie = new LittleBoat();
		// Now that andie is not a plain Vehicle, we must replace him
		theCity.replaceVehicle(andie);

		theCity.setBackground("Ocean.gif");
		theCity.setWall("LifePreserver.gif");
		theCity.setBackgroundNoRefresh("Space.gif");
		
		andie.ahead();
		andie.ahead();
		andie.turnLeft();
		andie.turnLeft();
		andie.turnLeft();
		andie.ahead();
		andie.ahead();
		
	}
}

The java files from this example -> GraphicsDemo3.java
                                 -> 
LittleBoat.java
                                 -> 
Box.java The gcw file from this example -> graphicsExample2.gcw
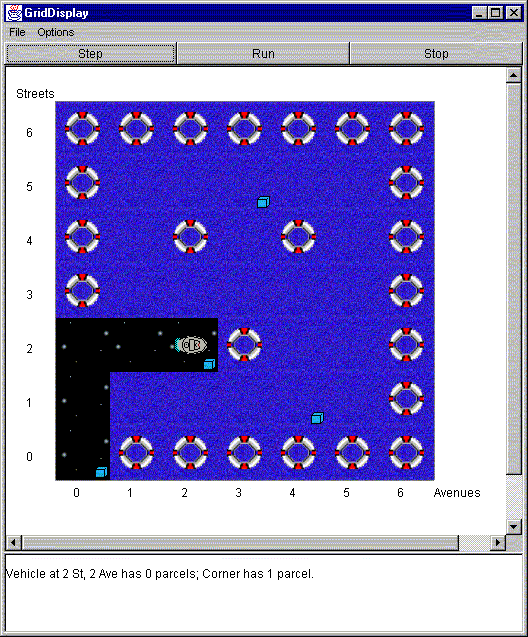
And now you'll be able to see parcels:


How To Make World Files

When you start the Editor, two windows will appear -- a normal grid and an editor control window. The control window contains all of the buttons to let you modify the world.

The "Clear" button erases all of the objects (vehicles, parcels, and walls) from the grid. The "Load" button allows you to read in a world description from a file. The "Save" button writes a description of the current world to a file.

The "Add Street"/"Delete Street" buttons add and remove rows to the grid (respectively). The "Add Avenue"/"Delete Avenue" buttons add and remove columns to the grid (respectively).

Those buttons work the same all of the time. The remaining buttons work on the individual corner that is select. To select a corner, click on it in the grid. The control window contains a status line that tells you which corner is selected and how many parcels are on that corner.

Once a corner is selected, you can toggle the presence of a wall (add a wall to the corner does not have one or take away the wall if it is there) with the "Toggle Wall" button. The "Toggle Vehicle" button likewise allows you to toggle the presence of a vehicle on the selected corner.

If the selected corner has a vehicle on it, then you may add parcels to and remove parcels from the collection that the vehicle is carrying and you may turn the vehicle around. The buttons to control the vehicle are next to the "To Vehicle" label. The "Add Parcel" button will add a parcel to those that the vehicle is carrying. The "Remove Parcel" button (if active) will remove a parcel from the vehicles collection. The "Turn Left" button will rotate the vehicle 90 degrees counter-clockwise.

Parcels can also be placed on or removed from the selected corner. The "Add Parcel" and "Remove Parcel" buttons next to the "To Corner" label are used for this function.

To quit from the editor either close the control or grid windows or select "Quit" from the "File" menu in the grid window. You will not be prompted to save your file before you quit.

The actual world file that is created will have a .gcw extension. It is, however, basically nothing more than a text file. There will be times that you will want a world file to have more information than you can give it through the current Editor, to include this information in a world file, you will have to edit the world file in a basic text editor such as Notepad.

The actual format for world files is relatively simple. There are lots of optional arguments that you can include in the world file to specify parcel and vehicle types, as well as images for backgrounds and walls. If you would like to use any of the optional arguments, you will have to include all of the arguments that come before it in the given line. If there is no argument that you would like to include, but you need an argument after it, you can use null. Here is a list of all the arguments a world file can have:

The first line of a world file contains the size of the world, and images for the background and walls:

x,y world bg.gif newWall.gif
The first argument in the first line is the size of the world, which is formatted by width comma height. The keyword "world" will then always be inserted. The next argument will be the image to be used as the background, and after that will be the image to be used for walls.

Each line following the first line will have information regarding the location of vehicles, walls, and parcels. These do not have to be in any order, and the formats for each follow.

To place a vehicle in the world, the line looks something like:

x,y vehicle numParcels Direction VehicleType ParcelType
The first argument is the location of the vehicle, which is stated using x-location comma y-location. The keyword "vehicle" will then always be inserted. Next, you will tell it how many parcels the vehicle is carrying. After that comes the direction that the vehicle starts off facing (North, South, East, West). The default for this is East. The next argument is the type of Vehicle this is. The type of vehicle reffers to what class the vehicle is an instance of. This class will be some extention of the Vehicle class. Next is the parcel type. This is the same as the vehicle type. It reffers to the class of which these parcels will belong. The class will be some extension of the Parcel class. NOTE: A vehicle can only start off with one type of parcel.

To place a wall in the world use:

x,y wall
The first argument is the location of the wall, in the format x-location comma y-location. This is followed by the keyword "wall". There are no other arguments for walls.

To place a parcel (or multiple parcels) into the world, the line looks like this:

x,y parcel numParcels ParcelType
The first argument is the location of the parcel(s), which is stated using x-location comma y-location. The keyword "parcel" will then always be inserted. The next argument is the number of parcels on this corner. Next is the parcel type. This is the same as the vehicle type. It reffers to the class of which these parcels will belong. The class will be some extension of the Parcel class. NOTE: To place parcels of multiple types on the same corner use two different lines. ex: 1,1 parcel 3 BlueBox and 1,1 parcel 2 RedBox

Simulator Details

The simulator has several parts that you should know about. It is more of a library which takes care of various details (such as display). As such, you will write programs that utilize the parts of the library. The Vehicle class is the most important. It is largely through this class that you will work with the system. A Vehicle is an object that can pickup, carry, and deliver parcels around the world. A vehicle can face one of four directions: North, South, East, or West.

The primary methods available for the Vehicle object are :

ahead()
move vehicle forward one square.
turnLeft()
rotate 90 degrees counter-clockwise.
pickup()
get a parcel from the corner that the vehicle is at.
deliver()
one parcel from the vehicle is left on the corner where the vehicle is.
haveParcel()
test if the vehicle is currently carrying one or more parcels.
cornerHasParcel()
test if the corner that the vehicle is on has one or more parcels.
facingNorth(), facingSouth(), facingEast(), facingWest()
test if the vehicle is facing the specified direction.
wallAhead(), wallOnRight(), wallOnLeft()
test if there is a wall on a corner adjacent to the vehicle.
vehicleAhead(), vehicleOnRight(), vehicleOnLeft()
test if there is another vehicle on a corner adjacent to the vehicle.

The Vehicle class also includes a few addition methods, but these are not intended to be used by anything other than other GridCity classes.

I haven't worked past this point.

The ahead(), pickup(), and deliver() methods will produce "execution errors" if the action cannot be successfully completed because the vehicle is blocked or there are no parcels to work with. This error will cause the simulator to exit immediately.

For the World object, the primary methods are :

getVehicle()
Returns a reference to one of the Vehicle objects in the world.
replaceVehicle()
Replace an existing vehicle with a different vehicle object.
addVehicle()
Place the given Vehicle object in the world at the given coordinates.
load()
Load a description of the world from the given file. The filename may also be passed to the constructor.
save()
Write the description of the world as it is currently out to the given file.
Most of the remaining methods are used internally by the simulator.

There are Many classes in the simulator, however not all of these are intended to be generally used. Here is a list of all of the classes :

All of the classes include JavaDoc compatible comments which may be consulted if more information about a class is sought.

Misc.

Contact info, Sharing files, Getting help -- what goes here?

Related links at this site


Summer 1999 ActiveTutors Project [tutors@cs.heinz.cmu.edu]